1. shared State
- 공유된 state
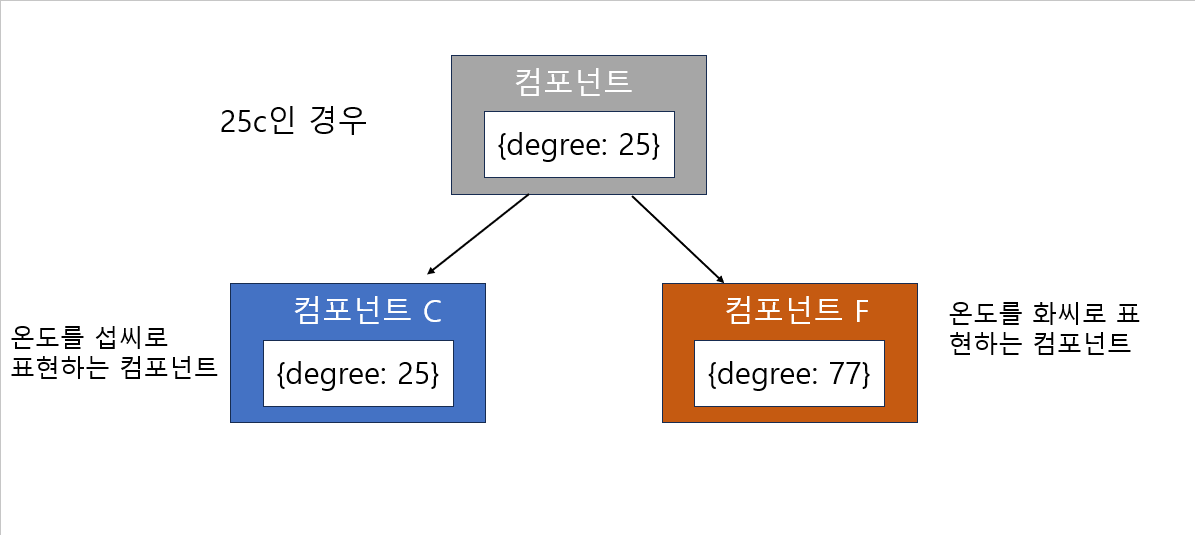
- 자식 컴포넌트들이 가장 가까운 부모 컴포넌트의 state를 공유해서 사용
- 어떤 컴포넌트의 state에 있는 여러 개의 하위 컴포넌트에서 공통적으로 사용하는 경우

- 부모 컴포넌트는 degree라는 이름의 섭씨온도 값을 갖고 있음
- 컴포넌트 C는 온도를 섭씨로 표현하는 컴포넌트
- 컴포넌트 F는 온도를 화씨로 표현하는 컴포넌트
- 자식 컴포넌트들이 각각 온도 값을 가지고 있을 필요 없이, 부모 컴포넌트의 state에 있는 섭씨온도 값을 변환해서 표시해주면 됨
2. 하위 컴포넌트에서 State 공유하기
- 사용자로부터 온도를 입력받아서 각각 섭씨온도와 화씨온도로 표현해 주고 해당 온도에서 물이 끓는지 안 끓는지를 출력해주는 컴포넌트
1) 물의 끓음 여부를 알려주는 컴포넌트
BoilingVerdict 컴포넌트
- 섭씨 온도 값을 props로 받아서 100도 이상이면 물이 끓는다는 문자열을 출력하고, 그외에는 물이 끓지 않는다는 문자열 출력
function BoilingVerdict(props) {
    if(props.celsius >=100) {
        return <p>물이 끓습니다.</p>;
    }
    return <p>물이 끓지 않습니다.</p>;
}
Calulator 컴포넌트
- state로 온도 값을 하나 갖고 있음
- 사용자로부터 입력을 받기 위해서 <input> 태그를 사용하여 제어 컴포넌트로 구현
- 사용자가 온도 값을 변경할 때마다 handleChange() 함수가 호출되고, setTemperature() 함수를 통해 온도 값을 갖고 있는 temperature라는 이름의 state를 업데이트
- state에 있는 온도값은 BoilingVerdict 컴포넌트의 celsius props로 전달
function Calculator(props) {
    const [temperature, setTemperature] = useState('');

    const handleChange = (event) => {
        setTemperature(event.target.value);
    }

    return (
        <fieldset>
            <legend>섭씨 온도를 입력하세요:</legend>
            <input
                value={temperature}
                onChange={handleChange} />
        </fieldset>
    )
}
2) 입력 컴포넌트 추출하기
- Calculator 컴포넌트 안에 온도를 입력하는 부분은 별도의 컴포넌트로 추출
-> 섭씨 온도와 화씨 온도를 각각 따로 입력받을 수 있도록 하여 재사용이 가능한 형태로 컴포넌트 작성
TemperatureInput 컴포넌트
- props에 단위를 나타내는 scale을 추가하여 온도의 단위를 섭씨 또는 화씨로 입력가능하도록 만듬
const scaleNames = {
    c:'섭씨',
    f:'화씨'
};

function TemperatureInput(props) {
    const [temperature, setTemperature] = useState('');

    const handleChange = (event) => {
        setTemperature(event.target.value);
    }

    return (
        <fieldset>
            <legend>온도를 입력해주세요(단위:{scaleNames[props.scale]}):</legend>
            <input value={temperature} onChange={handleChange} />
        </fieldset>
    )
}
Calculator 컴포넌트 변경
- 총 두개의 입력을 받을 수 있도록 되어있으며 하나는 섭씨온도를 입력받고 다른 하나는 화씨 온도를 입력받음
- 사용자가 입력하는 온도 값이 TemperatureInput의 state에 저장되기 때문에 섭씨온도와 화씨온도 값을 따로 입력받으면 두 개의 값이 다를 수 있는 문제 발생
-> 값을 동기화시켜줘야 함
function Calculator(props) {
     return (
    	<div>
        	<TemperatureInput scale="c" />
            <TemperatureInput scale="f" />
        </div>
     );
}
3) 온도 변환 함수 작성하기
- 섭씨온도와 화씨온도 값을 동기화시키기 위해서 각각 변환하는 함수를 작성해야 함
//화씨온도를 섭씨온도로 변환
function toCelsius(fahrenheit) {
	return (fahrenheit - 32) * 5 / 9;
}

//섭씨온도를 화씨온도로 변환
function toFahrenheit(celsius) {
	return (celsius * 9 / 5) + 32;
}
tryConvert 함수
- 온도 값과 변환하는 함수를 파라미터로 받아서 값을 변환시켜 리턴해주는 함수
- 숫자가 아닌 값을 입력하면 empty string을 리턴하도록 예외 처리
function tryConvert(temperature, convert) {
    const input = parseFloat(temperature);
    if(Number.isNaN(input)) {
    	return '';
    }
    const output = convert(input);
    const rounded = Math.round(output * 1000) / 1000;
    return rounded.toString();
}
4) Shard State 적용하기
State 끌어올리기 (Lifting State Up)
- 하위 컴포넌트의 state를 공통된 부모 컴포넌트로 올려서 shared state 적용
TemperatureInput 컴포넌트 수정
- 온도 값을 state에서 가져오는 것이 아닌 props를 통해서 가져오기
return (
    ...
    <input value={props.temperture} onChange={handleChange} />
    ...
)
- 컴포넌트의 state를 사용하지 않게 되기 때문에 입력값이 변경되었을 때 상위 컴포넌트로 값을 전달해줘야 함
- 사용자가 온도 값을 변경할 때마다 props에 있는 onTemperatureChange() 함수를 통해 변경된 온도 값이 상위 컴포넌트로 전달
const handleChange = (event) => {
   props.onTemperatureChange(event.target.value);
}
완성된 TemperatureInput 컴포넌트
- props로 scale과 temperature를 받아서 표시해주며, 온도 값이 변경되었을 때는 props로 onTemperatureChange() 함수를 호출하여 상위 컴포넌트로 변경된 값을 전달
const scaleNames = {
    c:'섭씨',
    f:'화씨'
};

function TemperatureInput(props) {
    const handleChange = (event) => {
        props.onTemperatureChange(event.target.value);
    };

    return (
        <fieldset>
            <legend>온도를 입력해주세요(단위:{scaleNames[props.scale]}):</legend>
            <input value={props.temperature} onChange={handleChange} />
        </fieldset>
    )
}

export default TemperatureInput;
5) Calculator 컴포넌트 변경하기
완성된 Calculator 컴포넌트
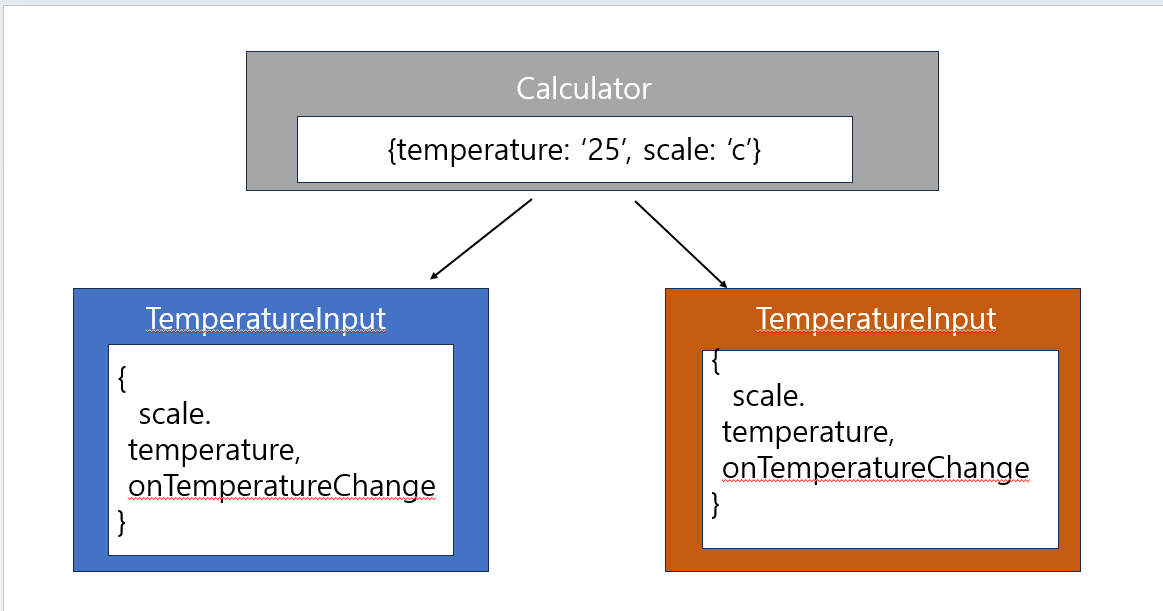
- state로 temperature와 scale을 선언하여 온도 값과 단위를 각각 저장하도록 함
- 이 온도와 단위를 이용하여 변환 함수를 통해 섭씨온도와 화씨온도를 구해서 사용
- TemperatureInput 컴포넌트를 사용하는 부분에서는 각 단위로 변환된 온도 값과 단위를 props로 넣어 주었고, 값이 변경되었을때 업데이트하기 위한 함수를 onTemperatureChange에 넣어줌
- 섭씨온도가 변경되면 단위가 'c'로 변경되고, 화씨온도가 변경되면 단위가 'f'로 변경됨
import React, { useState } from "react";
import TemperatureInput from "./TemperatureInput";

function BoilingVerdict(props) {
    if(props.celsius >= 100) {
        return <p>물이 끓습니다.</p>;
    }
    return <p>물이 끓지 않습니다.</p>;
}

//화씨온도를 섭씨온도로 변환
function toCelsius(fahrenheit) {
	return (fahrenheit - 32) * 5 / 9;
}

//섭씨온도를 화씨온도로 변환
function toFahrenheit(celsius) {
	return (celsius * 9 / 5) + 32;
}

function tryConvert(temperature, convert) {
    const input = parseFloat(temperature);
    if(Number.isNaN(input)) {
    	return '';
    }
    const output = convert(input);
    const rounded = Math.round(output * 1000) / 1000;
    return rounded.toString();
}

function Calculator(props) {
    const [temperature ,setTemperature] = useState("");
    const [scale, setScale] = useState("c");

    const handleCelsiusChange = (temperature) => {
        setTemperature(temperature);
        setScale("c");
    };

    const handleFahrenheitChange = (temperature) => {
        setTemperature(temperature);
        setScale("f");
    };

    const celsius =
        scale === "f"? tryConvert(temperature, toCelsius) : temperature;
    const fahrenheit =
        scale === "c"? tryConvert(temperature, toFahrenheit) : temperature;

    return (
        <div>
            <TemperatureInput
                scale="c"
                temperature={celsius}
                onTemperatureChange={handleCelsiusChange}
            />
            <TemperatureInput
                scale="f"
                temperature={fahrenheit}
                onTemperatureChange={handleFahrenheitChange}
            />
            <BoilingVerdict celsius={parseFloat(celsius)} />
        </div>
    )
}

export default Calculator;
- 상위 컴포넌트인 Calculator에서 온도 값과 단위를 각각의 state로 가지고 있으며, 두 개의 하위 컴포넌트는 각각 섭씨와 화씨로 변환된 온도 값과 단위 그리고 온도를 업데이트하기 위한 함수를 props로 가지고 있음

3. 실습 - 섭씨온도와 화씨온도 표시하기


'react' 카테고리의 다른 글
| [소플] ch 14. 컨텍스트 (1) | 2023.10.30 |
|---|---|
| [소플] ch 13. 합성 vs 상속 (0) | 2023.10.30 |
| [소플] ch 11. 폼 (0) | 2023.10.29 |
| [소플] ch 10. 리스트와 키 (0) | 2023.10.28 |
| [소플] ch 9. 조건부 렌더링 (1) | 2023.10.28 |


