17.1 UI 준비하기
- 프레젠테이셔널 컴포넌트와 컨테이너 컴포넌트를 분리
프레젠테이셔널 컴포넌트
- 상태 관리가 이루어지지 않고, 그저 props를 받아와서 화면에 UI를 보여 주기만 하는 컴포넌트
- src /components 경로
컨테이너 컴포넌트
- 리덕스와 연동되어 있는 컴포넌트
- src/containers 경로
17.2.1 카운터 컴포넌트 만들기
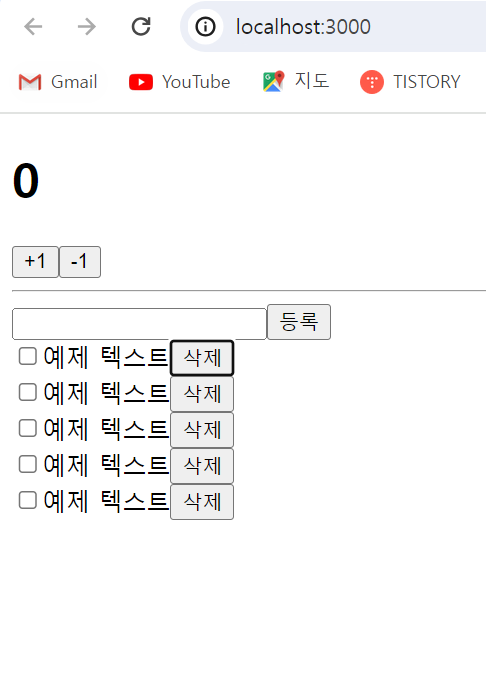
components/Counter.js
const Counter =  ({ number, onIncrease, onDecrease} ) => {
    return (
        <div>
            <h1>{number}</h1>
            <div>
                <button onClick={onIncrease}>+1</button>
                <button onClick={onDecrease}>-1</button>
            </div>
        </div>
    )
}

export default Counter;
17.2.2 할일 목록 컴포넌트 만들기
components / Todos.js
const TodoItem = ({todo, ontoggle, onRemove}) => {
    return (
        <div>
            <input type="checkbox"/>
            <span>예제 텍스트</span>
            <button>삭제</button>
        </div>
    );
};

const Todos = ({
    input, //인풋에 입력되는 텍스트
    todos, //할 일 목록이 들어 있는 객체
    onChangeInput,
    onInsert,
    onToggle,
    onRemove,
}) => {
    const onSubmit = e => {
        e.preventDefault();
    };

    return (
        <div>
            <form onSubmit={onSubmit}>
                <input />
                <button type="submit">등록</button>
            </form>
            <div>
                <TodoItem />
                <TodoItem />
                <TodoItem />
                <TodoItem />
                <TodoItem />
            </div>
        </div>
    )
}

export default Todos;
17.3 리덕스 관련 코드 작성하기
- 리덕스를 사용할 때는 액션 타입, 액션 생성 함수, 리듀서 코드를 작성해야 함
- 이 코드들을 각각 다른 파일에 작성하는 방법이 있고, 기능벼롤 묶어서 파일 하나에 작성하는 방법이 있음
일반적인 구조
- actions, constants, reducers라는 3 개의 디렉터리를 만들고 그 안에 기능별로 파일을 하나씩 만드는 방식
Ducks 패턴
- 액션 타입, 액션 생성 함수, 리듀서 함수를 기능별로 파일 하나에 몰아서 다 작성하는 방식
- 여기서는 이 방식을 사용
17.3.1 Counter 모듈 작성하기
모듈
- Ducks 패턴을 사용하여 액션 타입, 액션 생성 함수, 리듀서를 작성한 코드
1) 액션 타입 정의
modules/ counter.js
const INCREASE = 'counter/INCREASE';
const DECREASE = 'counter/DECREASE';
- 액션 타입은 대문자로 정의하고, 문자열 내용은 '모듈 이름 / 액션 이름'과 같은 형태로 작성
2) 액션 생성 함수 만들기
modules/ counter.js
//액션 타입 정의
const INCREASE = 'counter/INCREASE';
const DECREASE = 'counter/DECREASE';

//액션 생성 함수 만들기
export const increase = () => ({type: INCREASE});
export const decrease = () => ({type: DECREASE});
- export 키워드를 사용해 만든 함수를 다른 파일에서 불러와 사용할 수 있음
3) 초기 상태 및 리듀서 함수 만들기
modules/ counter.js
...
//초기 상태
const initialState = {
    number:0
};

//리듀서 함수
function counter(state=initialState, action) {
    switch(action.type) {
        case INCREASE:
            return {
                number: state.number +1
            };
        case DECREASE :
            return {
                number: state.number -1
            };
        default:
            return state;
    }
}

export default counter;
- 리듀서 함수에는 현재 상태를 참조하여 새로운 객체를 생성해서 반환하는 코드 작성
- export default 키워드를 사용하여 함수를 내보내줌
- export는 여러 개를 내보낼 수 있고, export default는 단 한 개만 내보낼 수 있음
- 리듀서 함수는 export default로 내보냄
- action 함수는 export로 내보냄
17.3.2 todos 모듈 만들기
1) 액션 타입 정의
modules/todos.js
//액션 타입 정의
const CHANGE_INPUT = 'todos/CHANGE_INPUT'; //인풋 값을 변경
const INSERT = 'todos/INSERT'; //새로운 todo를 등록
const TOGGLE = 'todos/TOGGLE'; //todo를 체크/체크 해제
const REMOVE = 'todos/REMOVE'; //todo를 제거
2) 액션 생성 함수 만들기
modules/ todos.js
//액션 생성 함수
export const changeInput = input => ({
    type: CHANGE_INPUT,
    input
});

let id =3; //insert가 호출될 때마다 1씩 더해짐
export const insert = text => ({
    type:INSERT,
    todo:{
        id:id++,
        text,
        done:false
    }
});

export const toogle = id => ({
    type:TOGGLE,
    id
});

export const remove = id => ({
    type:REMOVE,
    id
});
- 액션 생성 함수에서 파라미터 필요. 전달받은 파라미터는 액션 객체 안에 추가 필드로 들어가게 됨
- insert 함수는 파라미터 외에 사전에 이미 선언되어 있는 id 값에도 의존
-> 호출될 때마다 id 값에 1씩 더해 줌
-> id값은 todo 객체가 들고 있게 될 고윳값
3) 초기 상태 및 리듀서 함수 만들기
- 객체에 한 개 이상의 값이 들어가므로 불변성을 유지해 주어야 함
modules/todos.js
//초기 상태
const initialState = {
    input:'',
    todos: [
        {
            id:1,
            text:'리덕스 기초 배우기',
            done:true
        },
        {
            id:2,
            text:'리액트와 리덕스 사용하기',
            done:false
        }
    ]
};

//리듀서 함수
function todos(state=initialState, action) {
    switch(action.type) {
        case CHANGE_INPUT:
            return {
                ...state,
                input: action.input
            };
        case INSERT:
            return {
                ...state,
                todos: state.todos.concat(action.todo)
            };
        case TOGGLE:
            return {
                ...state,
                todos: state.todos.map(todo =>
                    todo.id === action.id ? {...todo, done: !todo.done} : todo
                    )
            };
        case REMOVE:
            return {
                ...state,
                todos: state.todos.filter(todo => todo.id !== action.id)
            };

        default:
            return state;

    }
}

export default todos;
17.3.3 루트 리듀서 만들기
- createStore 함수를 사용하여 스토어를 만들 때는 리듀서를 하나만 사용해야 함
- 그렇기 때문에 기존에 만들었던 리듀서를 하나로 합쳐 주어야 함
- 리덕스에서 제공하는 combineReducers 라는 유틸 함수를 사용하여 쉽게 처리 가능
modules/index.js
import { combineReducers } from 'redux';
import counter from './counter';
import todos from './Todos';

const rootReducer = combineReducers({
    counter,
    todos,
});

export default rootReducer;
17.4 리액트 애플리케이션에 리덕스 적용하기
- 스토어를 만들고 리액트 애플리케이션에 리덕스를 적용하는 작업은 src 디렉터리의 index.js에서 이루어짐
17.4.1 스토어 만들기
src/index.js
import React from 'react';
import ReactDOM from 'react-dom/client';
import App from './App';
import {createStore} from 'redux';
import rootReducer from './modules';

//스토어 생성
const store = createStore(rootReducer);

const root = ReactDOM.createRoot(document.getElementById('root'));
root.render(
    <App />
);
17.4.2 Provider 컴포넌트를 사용하여 프로젝트에 리덕스 적용
- 리액트 컴포넌트에서 스토어를 사용할 수 있도록 App 컴포넌트를 react-redux에서 제공하는 Provider 컴포넌트로 감싸줌
- 이 컴포넌트를 사용할 때는 store를 props로 전달해 주어야 함
src/index.js
import React from 'react';
import ReactDOM from 'react-dom/client';
import App from './App';
import {createStore} from 'redux';
import rootReducer from './modules';
import {Provider} from 'react-redux';

//스토어 생성
const store = createStore(rootReducer);

const root = ReactDOM.createRoot(document.getElementById('root'));
root.render(
    <Provider store={store}>
      <App />
    </Provider>
);
17.4.3 Redux DevTools의 설치 및 적용
redux-devTools-extension 패키지 설치
npm install redux-devTools-extensionsrc/index.js
import React from 'react';
import ReactDOM from 'react-dom/client';
import App from './App';
import {createStore} from 'redux';
import rootReducer from './modules';
import {Provider} from 'react-redux';
import { devToolsEnhancer } from 'redux-devtools-extension'

//스토어 생성
const store = createStore(rootReducer, devToolsEnhancer());

const root = ReactDOM.createRoot(document.getElementById('root'));
root.render(
    <Provider store={store}>
      <App />
    </Provider>
);

17.5 컨테이너 컴포넌트 만들기
- 리덕스 스토어에 접근하여 원하는 상태를 받아오고, 또 액션도 디스패치해줌
17.5.1 CounterContainer 만들기
- 컴포넌트를 리덕스와 연동하려면 react-redux에서 제공하는 connect 함수를 사용
connect(mapStateToProps, mapDispatchToProps) (연동할 컴포넌트)
mapStateToProps
- 리덕스 스토어 안의 상태를 컴포넌트의 props로 넘겨주기 위해 설정
mapDispatchToProps
- 액션 생성함수를 컴포넌트의 props로 넘겨주기 위해 설정
- connect 함수를 호출하고 나면 또 다른 함수를 반환
- 반환된 함수에 컴포넌트를 파라미터로 넣어 주면 리덕스와 연동된 컴포넌트가 만들어짐
const makeContainer = connect(mapStateToProps, mapDispatchToProps)
makeContainer(타깃 컴포넌트)
containers/CounterContainer.js
- mapStateToProps와 mapDispatchToProps를 미리 선언해 놓고 사용
import { connect } from "react-redux";
import Counter from "../components/Couter";
import { increase, decrease } from "../modules/counter";

const CounterContainer = ({number, increase, decrease}) => {
    return (
        <Counter number={number} onIncrease={increase} onDecrease={decrease} />
    );
};

const mapStateToProps = state => ({
    number:state.counter.number,
});

const mapDispatchToProps = dispatch => ({
    //액션 생성 함수를 불러와서 액션 객체를 만들고 디스패치
    increase: () => {
        dispatch(increase());
    },
    decrease: () => {
        dispatch(decrease());
    },
});

export default connect (
    mapStateToProps,
    mapDispatchToProps,
)(CounterContainer);
- mapStateToProps와 mapDispatchProp에서 반환하는 객체 내부의 값들은 컴포넌트의 props로 전달됨
- mapStateToProps는 state를 파라미터로 받아오며, 이 값은 현재 스토어가 지니고 있는 상태를 가리킴
containers/CounterContainer.js
- mapStateToProps와 mapDispatchToProps를 connect 함수 내부에 익명 함수 형태로 선언
import { connect } from "react-redux";
import Counter from "../components/Couter";
import { increase, decrease } from "../modules/counter";

const CounterContainer = ({number, increase, decrease}) => {
    return (
        <Counter number={number} onIncrease={increase} onDecrease={decrease} />
    );
};

//connect 함수 내부에 익명 함수 형태로
export default connect (
    state => ({
        number: state.counter.number,
    }),
    dispatch => ({
        increase: () => dispatch(increase()),
        decrease: () => dispatch(decrease()),
    }),
)(CounterContainer);
containers/CounterContainer.js
- 리덕스에서 제공하는 bindActionCreators 유틸 함수를 사용하면 컴포넌트에서 액션을 디스패치하기 위해 각 액션 생성 함수를 호출하고 dispatch로 감싸는 작업 생략
...
export default connect (
    state => ({
        number: state.counter.number,
    }),
    dispatch =>
        bindActionCreators(
            {
                increase,
                decrease,
            },
            dispatch,
        ),
)(CounterContainer);
containers/CounterContainer.js
- mapDispatchToProps에 해당하는 파라미터를 함수형태가 아닌 액션 생성 함수로 이루어진 객체 형태로 넣어줌
- 두번 째 파라미터를 객체 형태로 넣어 주면 connect 함수가 내부적으로 bindActionCreators 작업을 대신해 줌
...
export default connect (
    state => ({
        number: state.counter.number,
    }),
    {
        increase,
        decrease,
    },
)(CounterContainer);
17.5.2 TodosContainer 만들기
Container/TodosContainer.js
import { connect } from 'react-redux';
import {changeInput, insert, toggle, remove} from '../modules/todos';
import Todos from '../components/Todos';

const TodosContainer = ({
    input,
    todos,
    changeInput,
    insert,
    toggle,
    remove,
}) => {
    return (
        //todos 모듈에서 작성했던 액션 생성 함수와 상태 안에 있던 값을 컴포넌트의 props로 전달
        <Todos
            input={input}
            todos={todos}
            onChangeInput={changeInput}
            onInsert={insert}
            onToggle={toggle}
            onRemove={remove}
        />
    );
};

export default connect (
    //비구조화 할당을 통해 todos를 분리하여
    //state.todos.input 대신 todos.input을 사용
    ({todos}) => ({
        input: todos.input,
        todos: todos.todos,
    }),
    {
        changeInput,
        insert,
        toggle,
        remove,
    },
)(TodosContainer);
components/Todos.js
- Todos 컴포넌트에서 받아 온 props를 사용하도록 구현
const TodoItem = ({todo, onToggle, onRemove}) => {
    return (
        <div>
            <input
                type="checkbox"
                onClick={() => onToggle(todo.id)}
                checked={todo.done}
                readOnly={true}
            />
            <span style={{textDecoration:todo.done ? 'line-through':'none'}}>
                {todo.text}
            </span>
            <button onClick={() => onRemove(todo.id)}>삭제</button>
        </div>
    );
};

const Todos = ({
    input, //인풋에 입력되는 텍스트
    todos, //할 일 목록이 들어 있는 객체
    onChangeInput,
    onInsert,
    onToggle,
    onRemove,
}) => {
    const onSubmit = e => {
        e.preventDefault();
        onInsert(input);
        onChangeInput(''); //등록 후 인풋 초기화
    };
    const onChange = e => onChangeInput(e.target.value);

    return (
        <div>
            <form onSubmit={onSubmit}>
                <input value={input} onChange={onChange}/>
                <button type="submit">등록</button>
            </form>
            <div>
              {todos.map(todo => (
                <TodoItem
                    todo={todo}
                    key={todo.id}
                    onToggle={onToggle}
                    onRemove={onRemove}
                />
              ))}
            </div>
        </div>
    )
}

export default Todos;
17.6 리덕스 더 편하게 사용하기
- 액션 생성 함수, 리듀서를 작성할 때 redux-actions 라이브러리와 immer 라이브러리를 활용하면 리덕스를 훨씬 편하게 사용할 수 있음
17.6.1 redux-actions
- redux-actions를 사용하면 액션 생성 함수를 더 짧은 코드로 작성할 수 있음
- 리듀서 함수를 작성할 떄도 switch/case 문이 아닌 handleActions 함수를 사용하여 각 액션마다 업데이트 함수를 설정하는 형식으로 작성 가능
npm install redux-actions
1) counter 모듈에 적용
- 액션 생성 함수를 createAction 함수를 사용하여 만들어 줌
- 리듀서 함수를 handleActions 함수를 사용하여 만들어 줌
- handleActions 함수의 첫 번째 파라미터에는 각 액션에 대한 업데이트 함수를 넣어주고, 두 번째 파라미터에는 초기 상태를 넣어줌
modules/counter.js
import { createAction, handleAction } from 'redux-actions';

//액션 타입 정의
const INCREASE = 'counter/INCREASE';
const DECREASE = 'counter/DECREASE';

//액션 생성 함수 만들기
export const increase = () => createAction(INCREASE);
export const decrease = () => createAction(DECREASE);

//초기 상태
const initialState = {
    number:0
};

//리듀서 함수
const counter = handleAction(
    {
        [INCREASE] : (state, action) => ({number:state.number+1}),
        [DECREASE] : (state, action) => ({number:state.number-1}),
    },
    initialState,
)

export default counter;
2) todos 모듈에 적용
- createAction으로 액션을 만들면 액션에 필요한 추가 데이터는 payload라는 이름을 사용
- createAction으로 만든 액션 생성 함수는 파라미터로 받아 온 값을 객체 안에 넣을 때 원하는 이름으로 넣는 것이 아니라, action.id, action.todo와 같이 action.payload라는 이름을 공통적으로 넣어주게 됨
-> 기존의 업데이트 로직에서도 모두 action.payload 값을 조회하여 업데이트하도록 구현해주어야 함
modules/todos.js
import { createAction, handleAction } from "redux-actions";

//액션 타입 정의
const CHANGE_INPUT = 'todos/CHANGE_INPUT'; //인풋 값을 변경
const INSERT = 'todos/INSERT'; //새로운 todo를 등록
const TOGGLE = 'todos/TOGGLE'; //todo를 체크/체크 해제
const REMOVE = 'todos/REMOVE'; //todo를 제거

//액션 생성 함수
export const chagneInput = createAction(CHANGE_INPUT, input => input);

let id =3; //insert가 호출될 때마다 1씩 더해짐
export const insert = createAction(INSERT, text => ({
    id:id++,
    text,
    done:false,
}));

export const toggle = createAction(TOGGLE, id=>id);
export const remove = createAction(REMOVE, id=>id);

//초기 상태
const initialState = {
    input:'',
    todos: [
        {
            id:1,
            text:'리덕스 기초 배우기',
            done:true
        },
        {
            id:2,
            text:'리액트와 리덕스 사용하기',
            done:false
        }
    ]
};

//리듀서 함수
const todos = handleAction(
    {
        [CHANGE_INPUT]: (state,{payload: input}) => ({ ...state, input}),
        [INSERT] : (state, {payload: todo}) => ({
            ...state,
            todos: state.todods.concat(todo),
        }),
        [TOGGLE] : (state, {payload:id}) => ({
            ...state,
            todos:state.todos.map(todo =>
                todo.id === id ? {...todo, done: !todo.done} : todo,),
        }),
        [REMOVE] : (state, {payload: id}) => ({
            ...state,
            todos: state.todos.filter(todo => todo.id !==id),
        }),
    },
    initialState,
);

export default todos;
17.6.2 immer
- 객체의 구조가 복잡해지거나 객체로 이루어진 배열을 다룰 경우, immer를 사용하면 훨씬 더 편리하게 상태 관리 가능
npm install immer
modules/todos.js
import { createAction, handleAction } from "redux-actions";
import {produce} from 'immer';

...

//리듀서 함수
const todos = handleAction(
    {
        [CHANGE_INPUT]: (state,{payload: input}) =>
            produce(state, draft => {
                draft.input = input;
            }),
        [INSERT] : (state, {payload: todo}) =>
            produce(state, draft => {
                draft.todos.push(todo);
            }),
        [TOGGLE] : (state, {payload:id}) =>
            produce(state, draft => {
                const todo = draft.todos.find(todo => todo.id === id);
                todo.done = !todo.done;
            }),
        [REMOVE] : (state, {payload: id}) =>
            produce(state, draft => {
                const index = draft.todos.findIndex(todo => todo.id === id);
                draft.todos.splice(index, 1);
            }),
    },
    initialState,
);

export default todos;
17.7 Hooks를 사용하여 컨테이너 컴포넌트 만들기
17.7.1 useSelector로 상태 조회하기
- useSelector Hook을 사용하면 connect 함수를 사용하지 않고도 리덕스의 상태를 조회할 수 있음
const 결과 = useSelector(상태 선택 함수);
containers/CounterContainer.js
- connect 함수 대신 useSelector를 사용하여 counter.number 값을 조회함으로써 Counter에게 props를 넘겨 줌
import { useSelector } from "react-redux";
import Counter from "../components/Couter";
import { increase, decrease } from "../modules/counter";

const CounterContainer = () => {
    const number = useSelector(state => state.counter.number);
    return <Counter number={number} />;
};

export default CounterContainer;
17.7.2 useDispatch를 사용하여 액션 디스패치 하기
- useDispatch는 컴포넌트 내부에서 스토어의 내장 함수 dispatch를 사용할 수 있게 해줌
const dispatch = useDispatch();
dispatch({type: 'SAMPLE_ACTION'});
containers/CounterContainer.js
- useDispatch를 사용하여 INCREASE, DECREASE 액션 발생 시킴
- useCallback과 함께 사용하여 컴포넌트 성능 최적화
import { useCallback } from "react";
import { useDispatch, useSelector } from "react-redux";
import Counter from "../components/Couter";
import { increase, decrease } from "../modules/counter";

const CounterContainer = () => {
    const number = useSelector(state => state.counter.number);
    const dispatch  = useDispatch();
    const onIncrease = useCallback(() => dispatch(increase()), [dispatch]);
    const onDecrease = useCallback(() => dispatch(decrease()), [dispatch]);

    return (
    <Counter number={number} onIncrease={onIncrease} onDecrease={onDecrease} />
    );
};

export default CounterContainer;
17.7.3 useStore를 사용하여 리덕스 스토어 사용하기
- useStore Hook을 사용하면 컴포넌트 내부에서 리덕스 스토어 객체를 직접 사용할 수 있음
const store = useStore();
store.dispatch({type: 'SAMPLE_ACTION'});
store.getState();
17.7.4 TodosContainer를 Hooks로 전환하기
containers/TodosContainer.js
- useSelector를 사용할 때 비구조화 할당 문법을 사용
import { useCallback } from 'react';
import { useDispatch, useSelector } from 'react-redux';
import {changeInput, insert, toggle, remove} from '../modules/Todos';
import Todos from '../components/Todos';

const TodosContainer = () => {
    const {input, todos} = useSelector(({todos}) => ({
        input: todos.input,
        todos: todos.todos
    }));
    const dispatch = useDispatch();
    const onChangeInput = useCallback(input => dispatch(changeInput(input)), [dispatch]);
    const onInsert = useCallback(text => dispatch(insert(text)), [dispatch]);
    const onToggle = useCallback(id => dispatch(toggle(id)), [dispatch]);
    const onRemove = useCallback(id => dispatch(remove(id)), [dispatch]);

    return (
        <Todos
            input={input}
            todos={todos}
            onChangeInput={onChangeInput}
            onInsert={onInsert}
            onToggle={onToggle}
            onRemove={onRemove}
        />
    );
};

export default TodosContainer;
17.7.5 useActions 유틸 Hook을 만들어서 사용하기
- useActions Hook을 사용하면 여러 개의 액션을 사용해야 하는 경우 코드를 훨씬 깔끔하게 정리하여 작성할 수 있음
lib/useActions.js
- 액션 생성 함수를 액션을 디스패치하는 함수로 변환해줌
- 첫 번째 파라미터는 액션 생성 함수로 이루어진 배열
- 두 번째 파라미터는 deps 배열
Hooks | React Redux (react-redux.js.org)
Hooks | React Redux
API > Hooks: the `useSelector` and `useDispatch` hooks`
react-redux.js.org
import { bindActionCreators } from 'redux';
import { useDispatch } from 'react-redux';
import { useMemo } from 'react';

export default function useActions(actions, deps) {
  const dispatch = useDispatch();
  return useMemo(
    () => {
      if (Array.isArray(actions)) {
        return actions.map(a => bindActionCreators(a, dispatch));
      }
      return bindActionCreators(actions, dispatch);
    },
    // eslint-disable-next-line react-hooks/exhaustive-deps
    deps ? [dispatch, ...deps] : deps
  );
}
containers / TodoContainer.js
import React from 'react';
import { useSelector } from 'react-redux';
import { changeInput, insert, toggle, remove } from '../modules/todos';
import Todos from '../components/Todos';
import useActions from '../lib/useActions';

const TodosContainer = () => {
  const { input, todos } = useSelector(({ todos }) => ({
    input: todos.input,
    todos: todos.todos
  }));

  const [onChangeInput, onInsert, onToggle, onRemove] = useActions(
    [changeInput, insert, toggle, remove],
    []
  );

  return (
    <Todos
      input={input}
      todos={todos}
      onChangeInput={onChangeInput}
      onInsert={onInsert}
      onToggle={onToggle}
      onRemove={onRemove}
    />
  );
};

export default React.memo(TodosContainer);
'react' 카테고리의 다른 글
| [리액트를 다루는 기술] 18장 리덕스 미들웨어를 통한 비동기 작업 관리(2) (0) | 2023.12.11 |
|---|---|
| [리액트를 다루는 기술] 18장 리덕스 미들웨어를 통한 비동기 작업 관리(1) (1) | 2023.12.09 |
| [리액트를 다루는 기술] 16장 리덕스 라이브러리 이해하기 (0) | 2023.11.22 |
| [리액트를 다루는 기술] 15장 Context API (2) | 2023.11.22 |
| [리액트를 다루는 기술] 14장 외부 API를 연동하여 뉴스 뷰어 만들기 (1) | 2023.11.17 |


